


eSim has been gaining a lot of traction lately. The manufacturers of smartphones are including e-SIM support in their most recent models. If you use Jio and wish to switch from a standard SIM to an e-SIM, this post is for you. Jio SIM to eSim conversion is a relatively simple process. We are providing you with step-by-step instructions here.
Telecom providers have been urging their customers to convert to e-SIM for a while now. The owner of Airtel has also urged users to switch to e-SIM from physical SIM cards.
The main explanation for this is that it provides you with continuous connectivity. It provides you with greater security aside from this. Jio is likewise urging its users to do things similarly. We’ll explain how to turn your Jio SIM into an e-SIM today. Tell us about the procedure.

How to set up your Jio eSIM
This post is exclusively for Jio customers who wish to switch from SIM to eSIM. Let us inform you that this procedure is free and straightforward. Your SIM can then be transferred with ease.
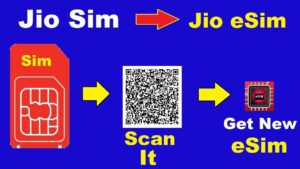
Sending the message “GETESIM” to 199 from your Jio SIM is required.
It would help if you located your IMEI and EID number in the Settings app.
Your carrier will then send you an SMS with more instructions.
A QR code will now be delivered to your registered email address.
You can now check or update your email address from your carrier’s app (MyJio App) if you need to alter your email ID.
After that, you only need to scan this QR code to finish the job.

Unique QR code for every phone
There are variations in the scanning process for each phone, so you must follow those.
To enable e-SIM on a Samsung device, navigate to Settings > Connections > SIM Card Manager > Add Mobile Plan > Use QR Code.
On the other hand, you must select Settings > Mobile Data > Add Data Plan if you use an Apple device.


